Standalone Vertex Invoice IQ
Read about how you can use Vertex Invoice IQ as a standalone component.
This topic is intended for users who are solely Vertex Invoice IQ customers. If you use one of the other products, this integration is likely already done and this topic does not apply to you. See Integrated Invoice IQ Deployments.
To integrate the service, you use the API. You can use the Store Transaction and Create Refund requests to integrate with your applications.
Settings
After the integration is complete, you can go to the Merchant Portal where you can adjust settings for your invoices under Settings > Invoicing.
API Integration
Transactions
You use the Store Transaction request to send transaction information to Vertex, where it is stored and an invoice is created.
To do so, use a POST operation and the following URL:
https://services.taxamo.com/api/v2/transactions/
You need to ensure that the status=C field is set. This means that the transaction is confirmed and an invoice will be issued.
You specify the details in the body of the request. For example:
$ curl -X 'POST' -H "Content-Type: application/json" -d \
 '{
      "transaction": {
          "transaction_lines": [
              {
                  "custom_id": "line1",
                  "amount": 100
              }
          ],
          "buyer_ip": "123.121.45.46",
	   “status”: “C”
          "currency_code": "EUR",
          "billing_country_code": "BE",
          "buyer_credit_card_prefix": "424242424"
      },
      "private_token": "priv_***********"
  }' \
 'https://services.taxamo.com/api/v2/transactions'
Shipping
You can model shipping as a separate transaction call. For example:
        "transaction_lines": [
            {
                "description":"Acme Hammer",
                "amount": 10,
                "informative":true,
                "tax_rate":20,
                "custom_id": "1"
            },
            {
                "description":"Shipping",
                "amount": 2,
                "informative":true,
                "tax_rate":10,
                "custom_id": "2"
            }
        ]
Manual and Automated Location Determination
You may want to manually send your customers’ location information to Vertex or you may want Vertex to automatically derive this information from the location evidence.
Vertex Invoice IQ functions in one of the following modes to facilitate this:
- Manual: When this mode is set to manual, Vertex does not verify or derive customer location based on evidence. Instead, the location is specified by you (in the
country_codefield) in the request that is sent to the API. - Automatic: When this mode is set to automatic, Vertex derives the customer’s location based on location evidence.
To enable manual mode, you need to add manual_mode=true to your requests. For example:
$ curl -X 'POST' -H "Content-Type: application/json" -d \
 '{
        “manual_mode”: “true”
        "transaction": {
          "transaction_lines": [
              {
                  "custom_id": "line1",
                  "amount": 100
              }
          ],
          "buyer_ip": "109.121.15.46",
	   “status”: “C”
          "currency_code": "EUR",
          "billing_country_code": "BE",
          "buyer_credit_card_prefix": "424242424"
      },
      "private_token": "priv_***********"
  }' \
 'https://services.taxamo.com/api/v2/transactions'
Process Flow
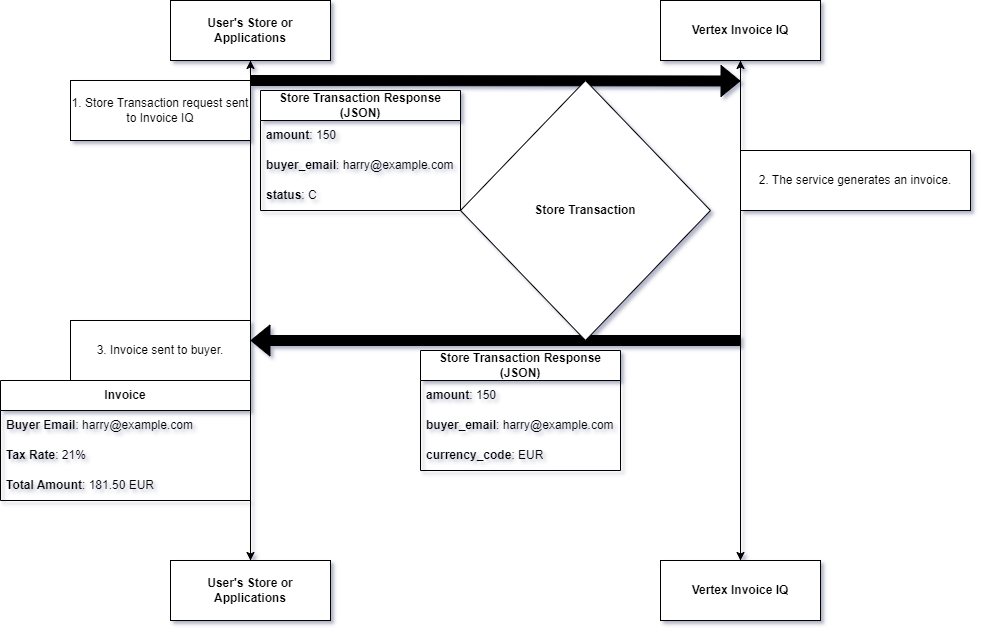
The following graphic shows an example process flow for a standalone deployment:

Standalone Invoice IQ Flow
The steps are as follows:
- A Store Transaction request is sent to Invoice IQ. The request contains all the information that will be displayed on the invoice.
- The service processes the invoice.
- The invoice is sent to the buyer and the invoice details are returned in the Store Transaction request's response.
Post Transaction Processing
Refunds
You use the Create a refund request to issue refunds and credit notes.
To create a refund, you use a POST method and the following URL:
https://services.taxamo.com/api/v2/transactions/{key}/refunds/
where {key} is the Transaction Key of the transaction that you wish to refund.
For example:
$ curl -X 'POST' 'https://services.taxamo.com/api/v2/transactions/T60YAAAABteWsHwfho8xUz1l4fuo/refunds?line_key=SQ0Kuuvp4P9VnEzq&private_token=priv_***********&total_amount=100'
You can also include relevant information in the body of the request. This is summarized in the following table:
| Body Parameter | Description |
|---|---|
| private_token | Private token. |
| key | Transaction key. |
| line_key | Line identifier. If neither line key or custom ID is provided, the refund amount will be assigned to lines in order. |
| refund_timestamp | Refund timestamp in yyyy-MM-dd HH:mm:ss or yyyy-MM-dd'T'HH:mm:ss'Z' format. No timezone conversion is applied. |
| amount | Amount (without tax) to be refunded. Either amount or total amount is required. In case of line key and custom id missing, only total_amount can be used. |
| total_amount | Total amount, including tax, to be refunded. Either amount or total amount is required. In case of line key and custom id missing, only total_amount can be used |
| refund_reason | Refund reason, displayed on the credit note. |
See Refunds Schema.
Updated 10 months ago
