Configuring Stripe as a Payment Provider
To enable the service to collect payments and manage Stripe subscriptions, use the Merchant Portal to connect a Stripe account in TEST and LIVE modes.
In the Merchant Portal, go to Settings > Manage Stripe Account and click Connect to Stripe. The Stripe Connect mechanism then guides you through the connection process.
Warning
Once the Stripe account is connected in LIVE mode, it may not be possible to change it without assistance from the Vertex support team. Ensure that you use the correct account for LIVE mode. TEST mode accounts can be reconnected any time through the Dashboard.
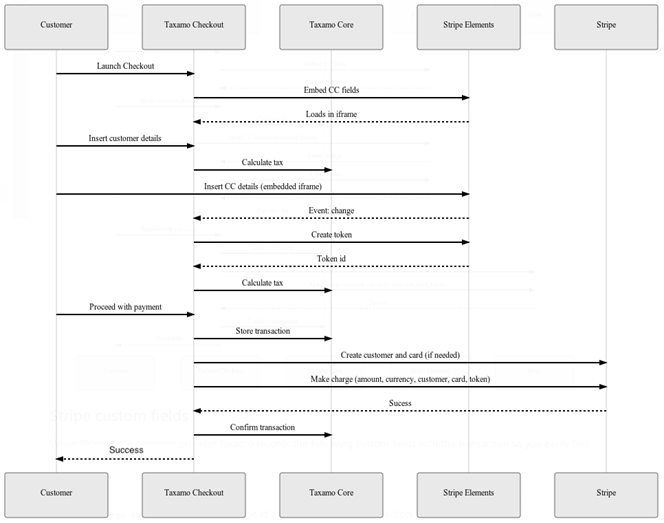
After the configuration is complete, Stripe is integrated into your webstore. The typical process flow for a Stripe integration is as follows:
- Customer visits the checkout page on the Merchant's store. The checkout is launched.
- The customer enters some details. The service calculates the tax.
- The customer proceeds with the payment. The transaction is stored by Vertex.
- The payment is charged in Stripe.
- The transaction is confirmed by Vertex.
The following graphic illustrates these steps:

Stripe Integration.
Custom Fields for Stripe
When Stripe is the payment provider, the service records the following custom fields with the transaction so you easily find the associated Stripe objects.
| Key | Value |
|---|---|
stripe-charge-id | The Stripe Charge ID that is associated with the transaction. |
stripe-customer-id | The Stripe Customer ID that is associated with the transaction. |
stripe-payment-intent-id | The Stripe PaymentIntent ID that is associated with the transaction. This is only present when SCA is enabled in the Stripe settings page. |
stripe-token | The Stripe Token that is associated with the transaction. This is only present when SCA is not enabled in the Stripe settings page. |
Updated about 3 years ago
